End-Users, Integrations, and Connections
April 18, 2024
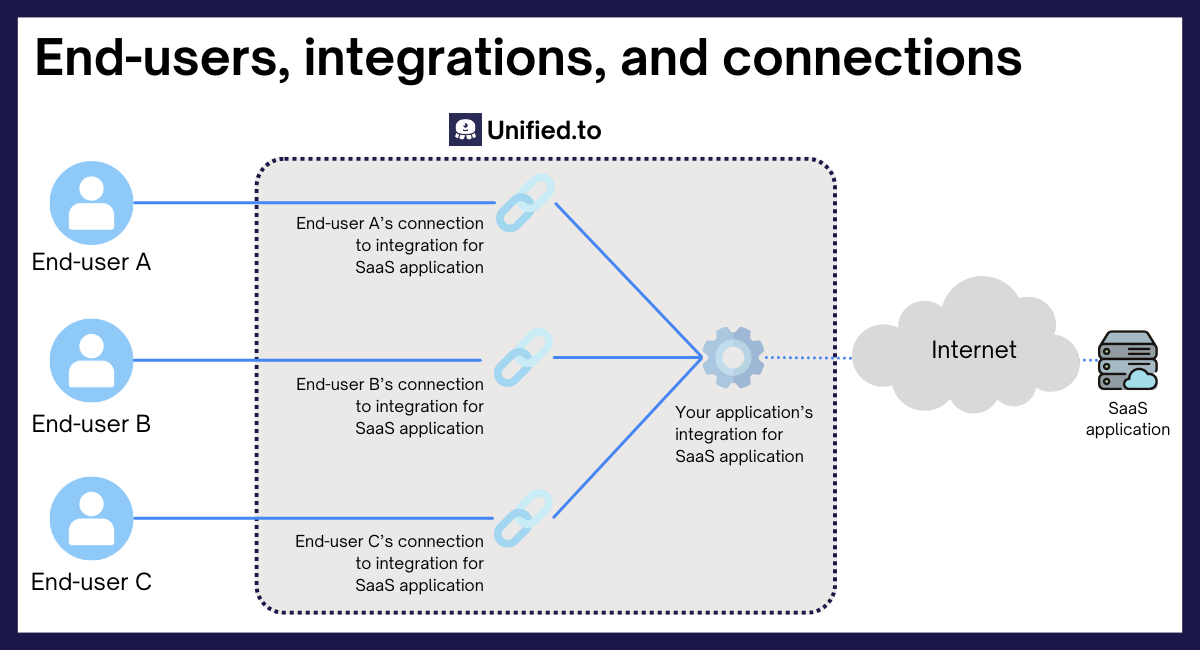
This guide explains how connections work at Unified.to and shows you different ways to create connections for your application. You'll learn about the relationship between your end-users, connections, and integrations, as well as how to get started quickly with test connections.
Overview
At Unified.to, there are three key concepts to understand:
- Integrations - These are the bridges between your application and third-party platforms (a.k.a SaaS apps). These are pre-built for you!
- Connections - These are the authorized links between your end-users and specific integrations
- End-users - These are your application's users whose data you will access from their accounts i.e. HubSpots, Salesforce, Shopify, and so on.
Understanding integrations
Your application communicates with a SaaS application through an integration.
Activating an integration in the sandbox environment
- Navigate to Integrations at app.unified.to/integrations
- Search for the integration you want to use
- Click on the integration card to view its details
- For sandbox environment integrations, you don't need to enter any real credentials here.
- Click Activate
All data is synthetic in the sandbox environment, meaning you don't need to sign up for any third-party accounts while you're testing the Unified.to platform.
Learn more about the sandbox environment →
Activating an integration in production environments
To activate an integration in production environments, you'll need developer credentials from the platform you're integrating with.
Developer credentials
When activating an integration, you'll be asked to provide credentials like API keys or OAuth 2.0 client IDs and secrets. These credentials should come from your developer account with the platform, not your end-users' accounts. Here's how it works:
- You register your application with the platform (e.g., create a HubSpot developer account and register your app)
- You receive developer credentials that identify your application
- You enter these credentials when activating the integration on Unified.to
- Your end-users will later authorize your application to access their accounts, with or without using their own credentials (depends on the type of auth flow)
For example, if you're building an interview scheduling platform that needs to access your clients' Zoho CRM data:
- You use your Zoho developer account credentials to activate the integration
- Your end-users will authorize access to their Zoho CRM accounts when creating connections by consenting to give you access to their data
Understanding connections
Your end-users are connected to integrations through connections_._
A connection is an authorized link between one of your end-users and a specific integration. For example, if your application needs to access a user's HubSpot account, you'll need:
- The HubSpot integration to be activated in your workspace
- A connection between that specific user and HubSpot
- The correct scope configuration for what data you need to access
Each user needs their own connection to each integration you want to use. This ensures proper authorization and data isolation between users.
About scopes
Scopes determine what data your application can access in your end-users' accounts. You need to:
- Configure the correct scopes in your developer account with the platform
- Select the corresponding Unified.to scopes when setting up your integration
For example, if you need to read CRM contacts, you would request the crm_contact_read scope. Unified.to has its own set of scopes (called Unified scopes) which have been mapped to the corresponding scopes for every single integration that needs them. When requesting scopes, you only need to pass in Unified scopes in addition to enabling those scopes in your developer account.
Learn more about configuring scopes →
How to create connections
There are three main ways to create connections in Unified.to, each suited for different scenarios:
1. Development and testing: Create test connections in the sandbox environment
This is the fastest way to get started and test integrations:
- Switch to the Sandbox environment in the Unified.to app
- Go to the Connections page
- Click Create test connection
- Select any activated integration you want to test
Test connections are created instantly with mock credentials, perfect for development and testing.
2. Production ready: Use the Authorization embedded component
This is the recommended approach for production-ready applications:
- Navigate to the Embedded Authorization page
- Configure your callback settings, permission scopes, and display options
- Copy the provided code snippet for your preferred tool (React, Angular, Vue, vanilla JavaScript, or an API call)
- Add the code to your application
- The Authorization component will be rendered on your app. When users click an integration's logo, they'll be guided through the authorization process
Example code for React:
import UnifiedDirectory from '@unified-api/react-directory';
function App() {
return (
<UnifiedDirectory
workspaceId="{WORKSPACE_ID}"
environmentId="{ENVIRONMENT}"
success_redirect="{SUCCESS_URL}"
/>
);
}
3. Custom implementation: Build your own authorization flow
For greater control over the user experience:
- Fetch available integrations using the Unified API
- Create authorization URLs for selected integrations
- Handle authorization callbacks
- Manage connection IDs
This approach requires slightly more implementation work but offers more flexibility. You can find a complete tutorial for this approach in our documentation.
Best practices
- Always test in Sandbox first: Use test connections to validate your integration logic
- Store connection IDs securely: Never store connection IDs in client-side storage in production
- Handle authorization failures gracefully: Provide clear feedback when connection attempts fail. Users will be redirected to the failure URL you specified during configuration. Learn more about handling failure callbacks here.
- Monitor connection health: Set up webhook notifications for connection status changes
- Configure scopes correctly: Request only the permissions your application needs
- Use separate environments: Keep your development and production environments separate
Troubleshooting
Common issues and solutions:
Connection creation fails
- Verify your developer credentials are correct
- Check that required scopes are configured both in your platform developer account and Unified.to
- Ensure redirect URLs are properly set up in your platform developer settings
Authorization flow issues
- Confirm your integration is activated
- Verify environment settings (Sandbox vs Production)
- Check that scopes match between your platform developer account and Unified.to
For more guidance, see: How to troubleshoot unhealthy connections
Next steps
- Try creating your first test connection in the sandbox environment
- Explore our Quickstart guide for a hands-on example
- Read our detailed guide on understanding and configuring scopes