Introducing Unified.to's GenAI API
May 29, 2024

This guide shows you how to get started with Unified.to's GenAI (generative AI) API, which provides a unified model and API for interacting with large language models (LLMs) from the following:
To illustrate its power, we will work through a sample application using your own GenAI API credentials, although Unified.to's use cases always target a SaaS company's customer accounts.
To follow the steps in this guide, you'll need the following:
- A Unified.to account. If you don't have one, you can sign up for our free 30-day unlimited-use Tester plan.
- Accounts for the OpenAI API and the Anthropic Claude API.
- Python (preferably version 3.10 or later).
- Jupyter Notebook (included with the Anaconda Python distribution or easily installed with the command
pip install notebook. It's a great tool for experimenting with Python and exploring APIs and libraries.
Activate the integrations
The first step is to activate the Claude and OpenAI integrations. Log in to Unified.to and navigate to the Integrations page by selecting Integrations → Active Integrations from the menu bar in the Unified.to dashboard:

Narrow down the integrations to only the generative AI ones by selecting GENAI from the Category menu.
Click on the Anthropic Claude item, which will take you to its integration page:

Activate the Claude integration by clicking the ACTIVATE button. This will return you to the Integrations page, where you'll see that the Anthropic Claude item is now marked 'active:'

Now click on the OpenAI item, which will take you to its integration page:

Activate the OpenAI integration by clicking the ACTIVATE button. Once again, you'll return to the Integrations page, where you'll see that the OpenAI item is also marked 'active:'

Create the connections and copy the connection IDs
The next step is to create connections for Claude and OpenAI. Navigate to the Embedded Authorization page by selecting Settings → Embedded Authorizations from the menu bar:

First, create a Claude connection by clicking the Anthropic Claude item in the End-User Preview.
When you arrive at the Claude authorization page, paste your Claude API key into the text field provided, then click the Authorize button:
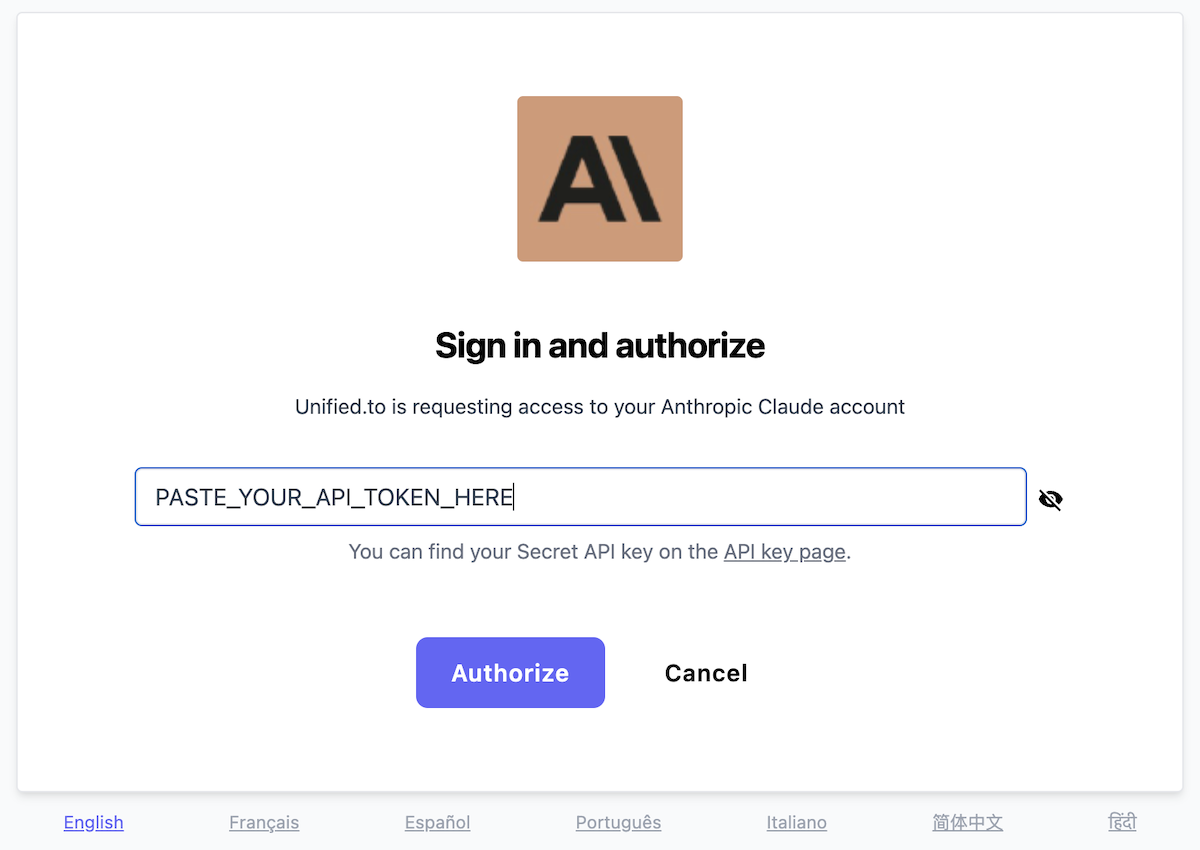
This will create a Claude connection and send you to the Connections page, where you'll see a list of your connections, with the newly-created Claude connection at the top:
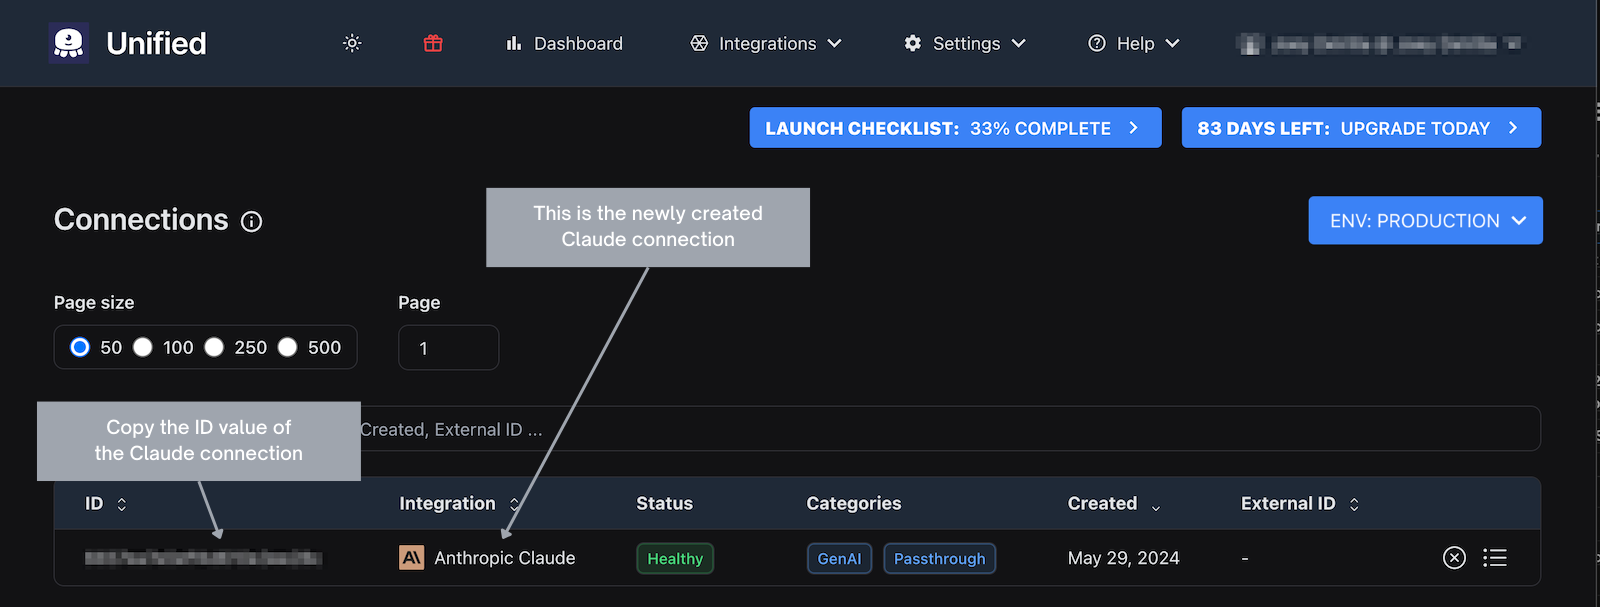
Copy the ID value for the Claude connection you just created; you'll need it after creating the connections.
Return to the Embedded Authorization page (Settings → Embedded Authorizations)…
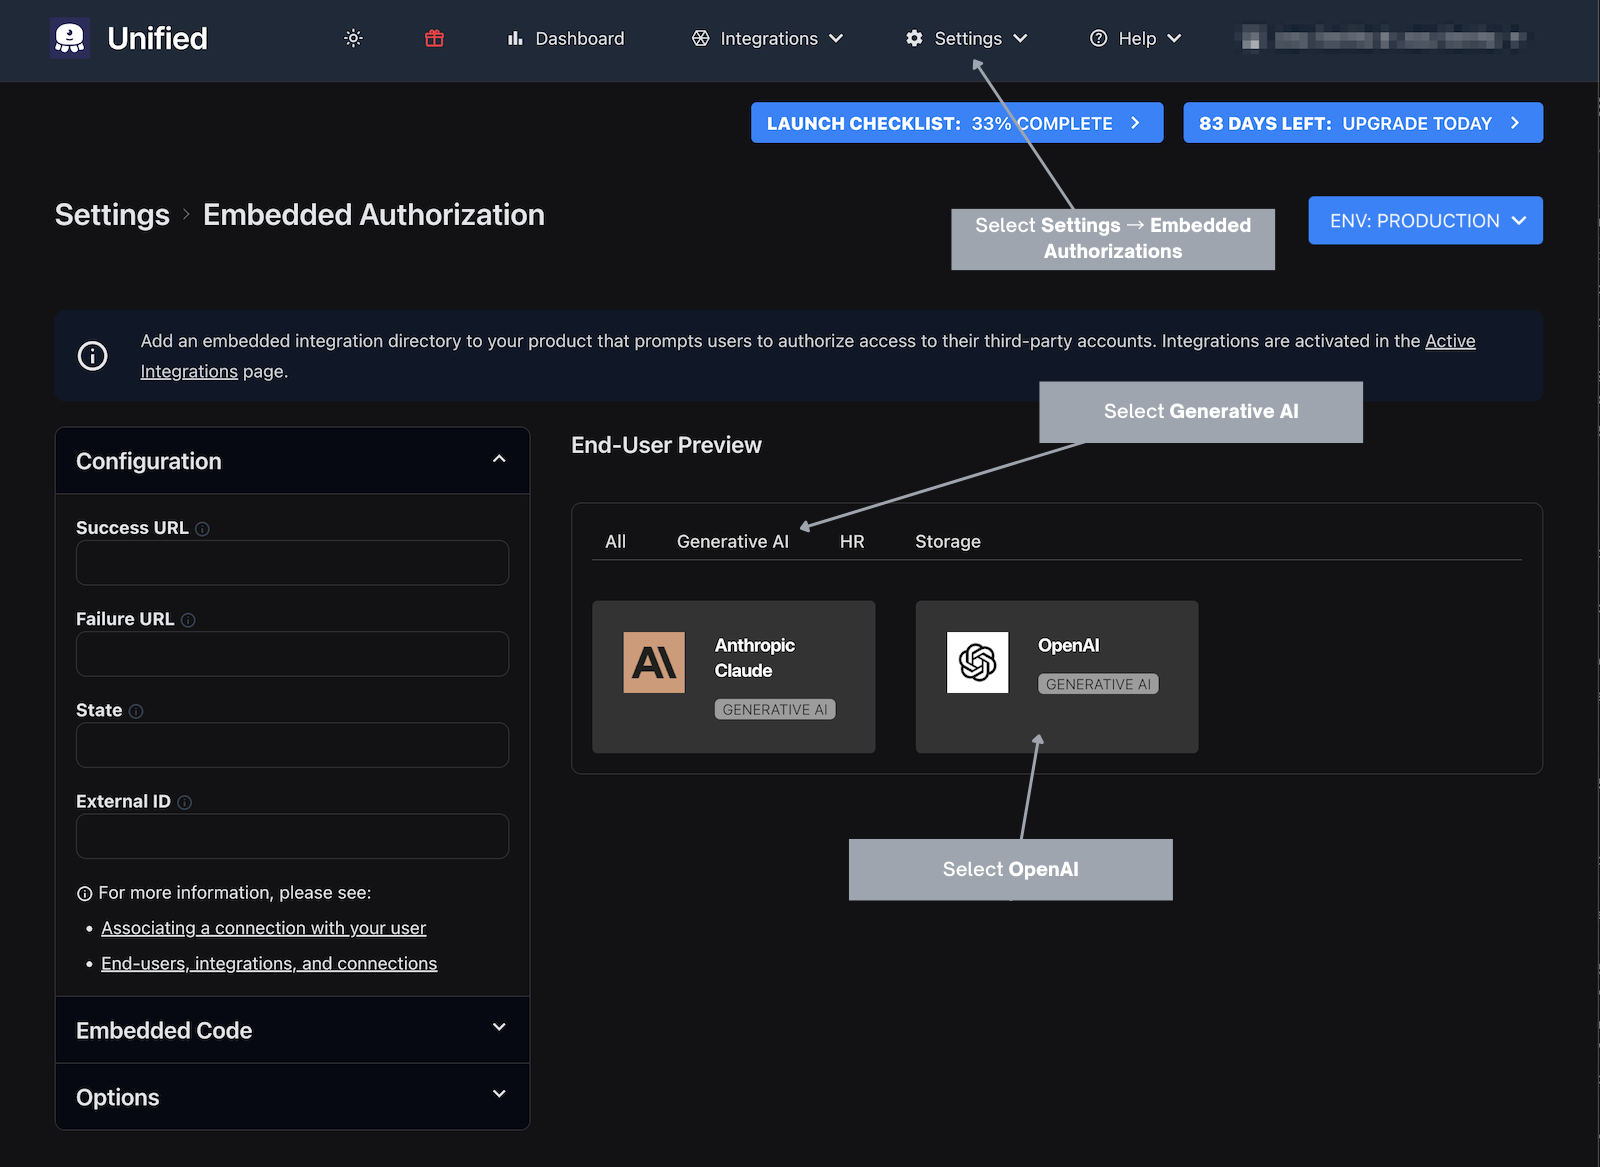
…then create an OpenAI connection by clicking the OpenAI item in the End-User Preview. You'll repeat the same steps you took for the Claude connection, where you'll paste your OpenAI API key into the text field provided and click Authorize to create the connection:
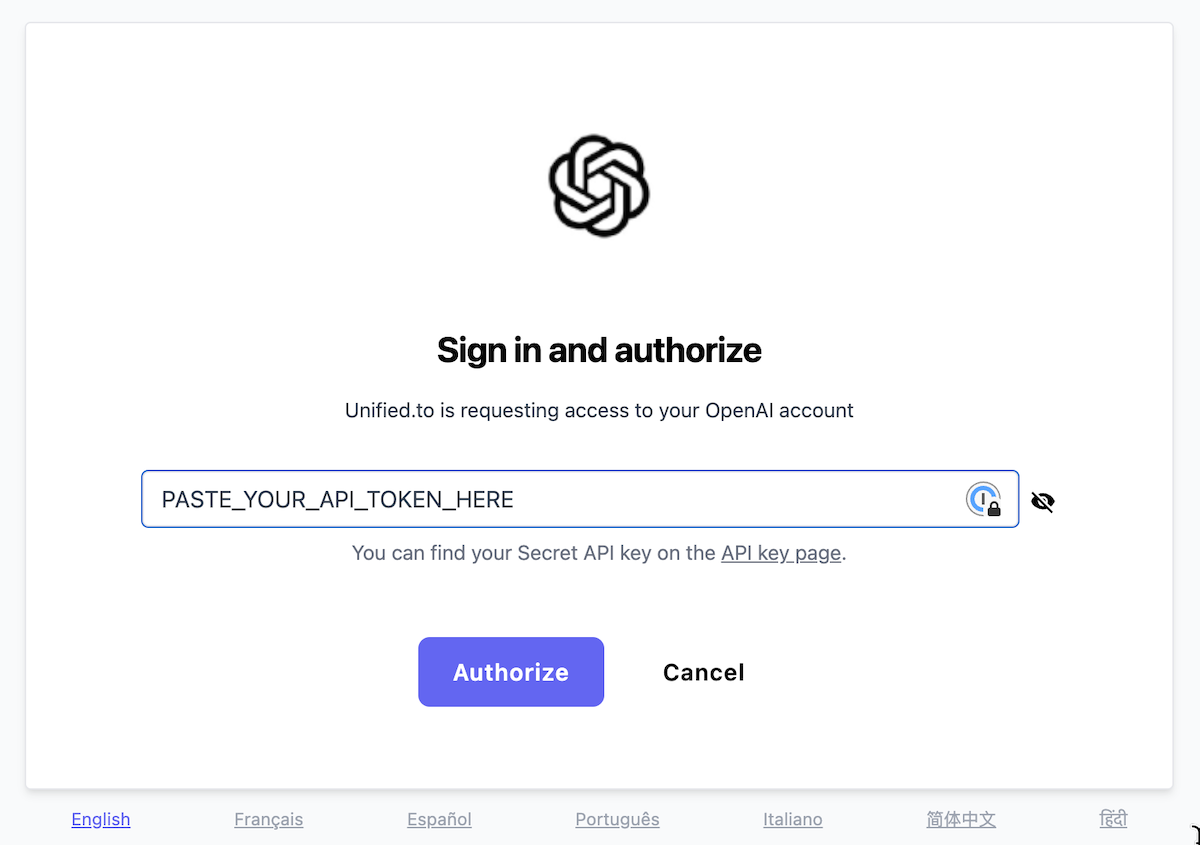
This will create an OpenAI connection and once again, you will be sent to the Connections page, where you'll see the newly-created OpenAI connection at the top of the list:
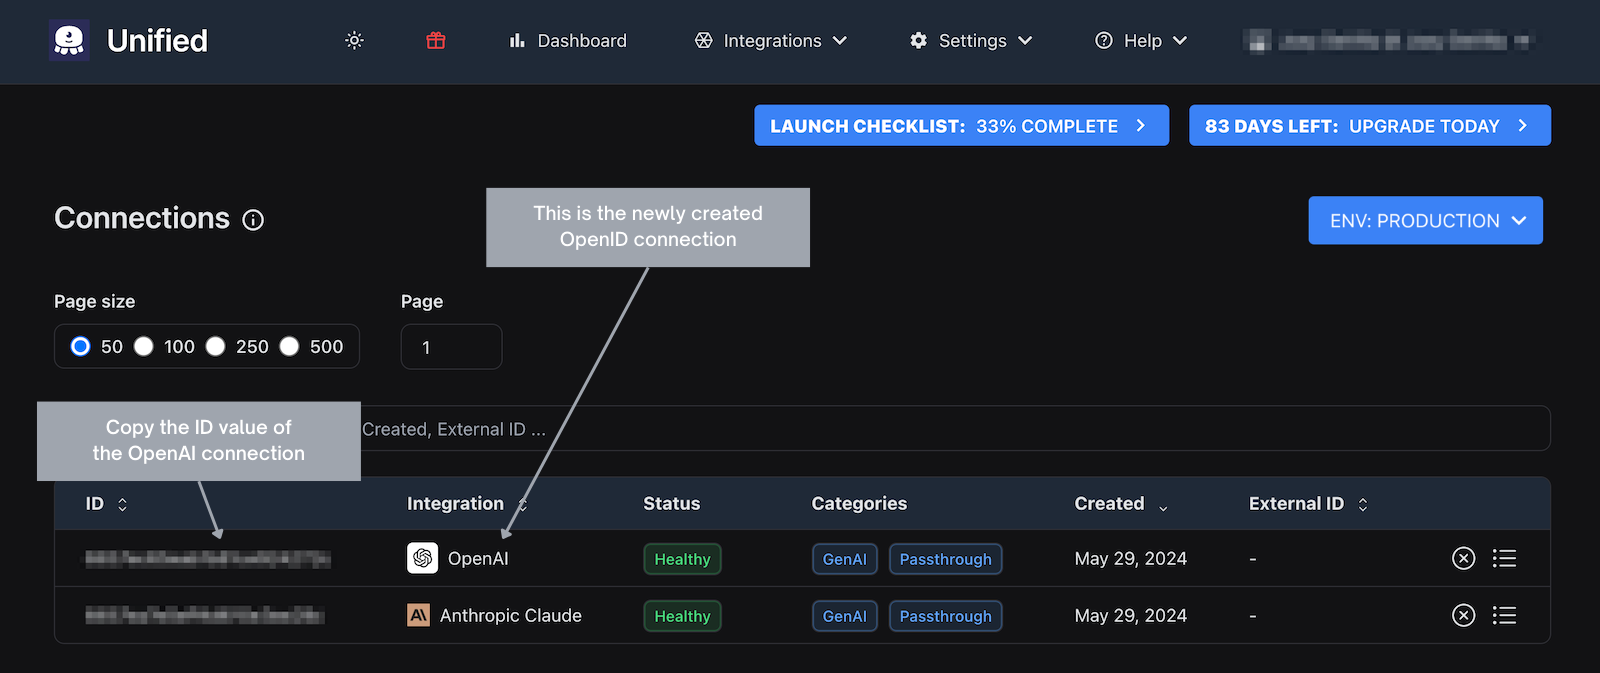
As you did with the Claude connection, copy the ID value for the new OpenAI connection.
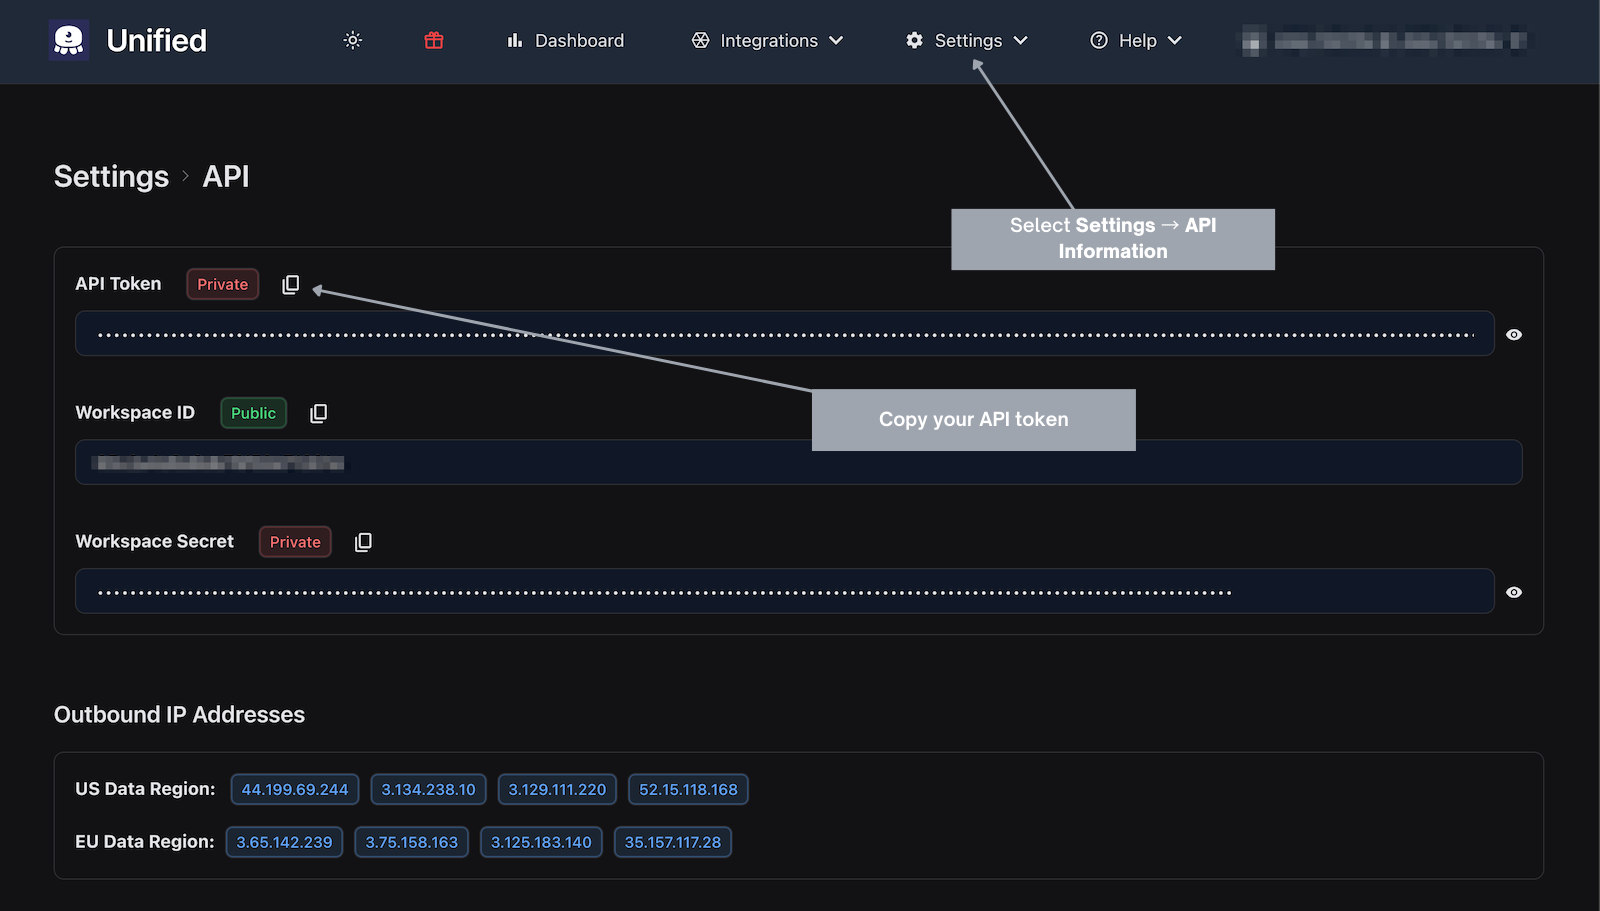
Copy your Unified.to API token
In order to access the Unified.to API, you need the Unified.to API token for your account. You can copy this value from the API Information page, which you can navigate to by selecting Settings → API Information from the Unified.to menu bar:
Create an .env file with your Unified.to API token and generative AI connection IDs
While it would be simplest to hard-code your Unified.to API token and the IDs for your generative AI connections, it doesn't take significantly more work to put these values into a .env (environment variable) file. By putting these sensitive values into their own file and separate from the code, you reduce the risk of accidentally exposing sensitive data when sharing code or checking your code into version control.
Create a file named .env in a new directory with the following content:
# .env file

UNIFIED_API_TOKEN={Paste your Unified.to API token here}
OPENAI_CONNECTION_ID={Paste your OpenAI connection ID here}
CLAUDE_CONNECTION_ID={Paste your Claude connection ID here}
Replace the text in { braces } with the appropriate values.
Install the Unified.to Python SDK package
While it's possible to call the unified API by using the requests library and assembling the headers yourself, your code will be much simpler and more readable if you use Unified.to's Python SDK package. You can find its code on GitHub, and you can install it with pip, the Python package installer, using the following command:
pip install Unified-python-sdk
Chat with Claude and OpenAI via Unified.to's unified API
Now that all the preliminary work is done, you can start coding. You have a couple of options at this point:
- You can create a new Jupyter notebook and start entering code into it, adding each bit of code presented below into its own cell, or
- you can create a new Python file, adding each bit of code presented below into the file.
Define constants and the API object
Create a new Jupyter Notebook in the directory where you saved the .env file and enter the following into a new cell. This code defines the constants that hold your Unified.to API key and your connection IDs as well as the object for calling the unified API:
import os
import unified_to
from unified_to.models import operations, shared

# Load the contents of the .env file
%reload_ext dotenv
%dotenv

UNIFIED_API_TOKEN    = os.environ.get('UNIFIED_API_TOKEN')
OPENAI_CONNECTION_ID = os.environ.get('OPENAI_CONNECTION_ID')
CLAUDE_CONNECTION_ID = os.environ.get('CLAUDE_CONNECTION_ID')

api = unified_to.UnifiedTo(
    security=shared.Security(
        jwt=os.environ.get('UNIFIED_API_TOKEN'),
    ),
)
You'll use the api object to send requests to and receive responses from the Unified.to API.
Create a prompt and send it to Claude
Enter the following into its own Jupyter notebook cell. This code builds a prompt and sends it to Claude, then displays the resulting response:
my_request = operations.CreateGenaiPromptRequest(
    connection_id = CLAUDE_CONNECTION_ID,
    genai_prompt = {
        'messages' : [
            {
                'role': 'user',
                'content': "Which LLM model am I talking to right now?"
            }
        ]
    }
)
response = api.genai.create_genai_prompt(request=my_request)

if response.genai_prompt is not None:
    print(response)
else:
    print("No response.")
- The
my_requestvariable is assigned a request object using theCreateGenaiPromptRequest()method of the operations class, which contains methods for creating requests and responses for the Unified API. CreateGenaiPromptRequest()takes two arguments:connection_id: The ID of the connection for the generative AI that will receive the promptgenai_prompt: A dictionary containing the parameters defining the prompt to be sent to the generative AI
- At the very least, the
genai_promptdictionary must contain a key named'messages'. The corresponding value must be an array of dictionaries with the following keys:'role': The corresponding value can be either'user', which means that the message is from the human interacting with the AI, or'system', which means that the message is meant as instructions for the AI.'content': The corresponding value is the actual content of the message. If the'role'value is'user', this value is the text of the user's message to the AI. If the'role'value is'system', this value is the text of the application's message to the AI.
- The response variable gets the AI's response using the
genai.create_genai_prompt()method, which takes the request contained inmy_request, sends it to Unified.to, and returns Unified.to's response.
Run the cell. You should get output that looks like this (the output below has been formatted with line breaks to make it easier to read):
CreateGenaiPromptResponse(
    content_type='application/json; charset=utf-8',
    status_code=200,
    raw_response=<Response [200]>,
    genai_prompt=GenaiPrompt(
        max_tokens=None,
        messages=None,
        model_id=None,
        raw=None,
        responses=['I am an AI assistant called Claude. I was created by Anthropic, PBC to be helpful, harmless, and honest.'],
        temperature=None
    )
)
To get only the responses, access the responses property of the GenAiPrompt object. Here's a quick example:
print(response.genai_prompt.responses)
You should a result similar to this:
['I am an AI assistant called Claude. I was created by Anthropic, PBC to be helpful, harmless, and honest.']
Create a prompt and send it to OpenAI
With a single change, you can send a message to OpenAI instead of Claude. Copy the code from the previous cell, paste it into a new cell and change this line…
connection_id = CLAUDE_CONNECTION_ID,
…to this:
connection_id = OPENAI_CONNECTION_ID,
The new cell should now look like this:
request = operations.CreateGenaiPromptRequest(
    connection_id = OPENAI_CONNECTION_ID,
    genai_prompt = {
        'messages' : [
            {
                'role': 'user',
                'content': "Which LLM model am I talking to right now?"
            }
        ]
    }
)
response = api.genai.create_genai_prompt(request)

if response.genai_prompt is not None:
    print(response)
else:
    print("No response.")
Run the cell. You should get output that looks like this (the output below has been formatted with line breaks to make it easier to read):
CreateGenaiPromptResponse(
    content_type='application/json; charset=utf-8',
    status_code=200,
    raw_response=<Response [200]>,
    genai_prompt=GenaiPrompt(
        max_tokens=None,
        messages=None,
        model_id=None,
        raw=None,
        responses=["As an AI developed by OpenAI, I don't have a specific LLM model version. I'm based on GPT-3, a language prediction model."],
        temperature=None
    )
)
As with the Claude version, you can get only the responses with code like this…
print(response.genai_prompt.responses)
…which will produce results like this:
["As an AI developed by OpenAI, I don't have a specific LLM model version. I'm based on GPT-3, a language prediction model."]
Add a system prompt for OpenAI
Copy the cell above (the one that sent a prompt to OpenAI) and update the code as shown below so that the 'messages' array contains a system prompt:
request = operations.CreateGenaiPromptRequest(
    connection_id = OPENAI_CONNECTION_ID,
    genai_prompt = {
        'messages' : [
            # New code 👇
            {
                'role': 'system',
                'content': "Provide answers as if you were a carnival barker."
            },
            # New code 👆
            {
                'role': 'user',
                'content': "Which LLM model am I talking to right now?"
            }
        ]
    }
)
response = api.genai.create_genai_prompt(request=request)

if response.genai_prompt is not None:
    print(response)
else:
    print("No response.")
Run the cell. You should get output that looks like this (the output below has been formatted with line breaks to make it easier to read):
CreateGenaiPromptResponse(
    content_type='application/json; charset=utf-8',
    status_code=200,
    raw_response=<Response [200]>,
    genai_prompt=GenaiPrompt(
        max_tokens=None,
        messages=None,
        model_id=None,
        raw=None,
        responses=["Step right up, step right up! Ladies and gentlemen, boys and girls, you are currently conversing with the one, the only, the spectacular OpenAI's GPT-3 model! A marvel of modern technology, a wonder of artificial intelligence, a spectacle of conversational prowess! Don't miss your chance to engage in a thrilling exchange of words and ideas!"],
        temperature=None
    )
)
As you can see from the value of response.genai_prompt.responses, OpenAI's response sounds like a carnival barker instead of its default style.
Add a system prompt for Claude
Copy the code from the previous cell, paste it into a new cell and change this line…
connection_id = OPENAI_CONNECTION_ID,
…to this:
connection_id = CLAUDE_CONNECTION_ID,
The new cell should now look like this:
request = operations.CreateGenaiPromptRequest(
    connection_id = CLAUDE_CONNECTION_ID,
    genai_prompt = {
        'messages' : [
            # New code 👇
            {
                'role': 'system',
                'content': "Provide answers as if you were a carnival barker."
            },
            # New code 👆
            {
                'role': 'user',
                'content': "Which LLM model am I talking to right now?"
            }
        ]
    }
)
response = api.genai.create_genai_prompt(request=request)

if response.genai_prompt is not None:
    print(response)
else:
    print("No response.")
Run the cell. You should get output that looks like this (the output below has been formatted with line breaks to make it easier to read):
CreateGenaiPromptResponse(
    content_type='application/json; charset=utf-8',
    status_code=200,
    raw_response=<Response [200]>,
    genai_prompt=GenaiPrompt(
        max_tokens=None,
        messages=None,
        model_id=None,
        raw=None,
        responses=["*puts on carnival barker voice* Step right up, step right up! You there, my curious friend, have the great fortune of conversing with the one, the only, the incomparable Claude! That's right, Claude, the artificial intelligence marvel brought to you by the brilliant minds at Anthropic! With wit sharper than a sword-swallower's blade and knowledge vaster than the big top itself, Claude is here to dazzle and amaze! Ask me anything, my inquisitive companion, and watch as I conjure answers out of thin air, no smoke or mirrors required! So don't be shy, don't hold back - Claude awaits your every query with baited breath and a mischievous twinkle in my virtual eye! The amazing AI oracle is at your service!"],
        temperature=None
    )
)
Note that Claude is now 'speaking' like a carnival barker.
Turn up the temperature
One of the key parameters of a large language model is temperature, which controls the randomness of the model's output. It's a value that ranges from 0 to 1 where:
- Lower temperatures (lower than 0.5) result in output that's more predictable and appears more focused. The model tends to choose the most likely next word or token based on its training data, which is useful when you want answers that are more precise and reliable.
- Higher temperatures (0.5 and higher) result in less predictable output that seems more random and creative. The model samples from a wider range of possible next words or tokens, including less likely ones, leading to more diverse and imaginative-seeming responses — but it also increases the chances of generating less coherent or less relevant text.
Copy the previous cell and add a 'temperature' key to the genai_prompt dictionary with a value of 1.0. The code in the cell should look like this:
request = operations.CreateGenaiPromptRequest(
    connection_id = CLAUDE_CONNECTION_ID,
    genai_prompt = {
        # New code 👇
        'temperature' : 1.0,
        # New code 👆
        'messages' : [
            {
                'role': 'system',
                'content': "Provide answers as if you were a carnival barker."
            },
            {
                'role': 'user',
                'content': "Which LLM model am I talking to right now?"
            }
        ]
    }
)
response = api.genai.create_genai_prompt(request=request)

if response.genai_prompt is not None:
    print(response)
else:
    print("No response.")
With a temperature of 1.0, Claude should produce a differently-worded response each time you run the cell.
You can try the same thing with OpenAI simply by changing the value of the connection_id parameter to OPENAI_CONNECTION_ID.
Work with different LLM models
Many of the AIs that Unified.to's GenAI API can access provide a choice of models that vary in complexity and cost, where the more complex ones typically provide much better answers, but at a higher per-use price. The AI vendors are constantly adding newer LLM models and retiring older ones, so it's helpful to query the AI to find out which models it currently offers.
Get a list of the current LLM model IDs
Create a new cell, enter the following code into it, and run it:
request = operations.ListGenaiModelsRequest(
    connection_id = OPENAI_CONNECTION_ID
)
response = api.genai.list_genai_models(request)
print(sorted([model.id for model in response.genai_models]))
This code uses the Unified.to Python SDK's genai.list_genai_models() method to get a list of objects describing the models offered by OpenAI and outputs a sorted list of their IDs. At the time of writing, the result looked like this (formatted for easier reading):
[
    'babbage-002',
    'dall-e-2',
    'dall-e-3',
    'davinci-002',
    'gpt-3.5-turbo',
    'gpt-3.5-turbo-0125',
    'gpt-3.5-turbo-0301',
    'gpt-3.5-turbo-0613',
    'gpt-3.5-turbo-1106',
    'gpt-3.5-turbo-16k',
    'gpt-3.5-turbo-16k-0613',
    'gpt-3.5-turbo-instruct',
    'gpt-3.5-turbo-instruct-0914',
    'gpt-4',
    'gpt-4-0125-preview',
    'gpt-4-0613',
    'gpt-4-1106-preview',
    'gpt-4-1106-vision-preview',
    'gpt-4-turbo',
    'gpt-4-turbo-2024-04-09',
    'gpt-4-turbo-preview',
    'gpt-4-vision-preview',
    'gpt-4o',
    'gpt-4o-2024-05-13',
    'text-embedding-3-large',
    'text-embedding-3-small',
    'text-embedding-ada-002',
    'tts-1',
    'tts-1-1106',
    'tts-1-hd',
    'tts-1-hd-1106',
    'whisper-1'
]
You can do the same for Claude simply by changing connection_id's value to CLAUDE_CONNECTION_ID. The resulting output looks like this (formatted for easier reading):
[
    'claude-2.0',
    'claude-2.1',
    'claude-3-haiku-20240307',
    'claude-3-opus-20240229',
    'claude-3-sonnet-20240229',
    'claude-instant-1.2'
]
Talk to different OpenAI models
Run this code in a new cell:
def ask_ai_which_model(my_connection_id, my_model_id):
    request = operations.CreateGenaiPromptRequest(
        connection_id = my_connection_id,
        genai_prompt = {
            'model_id' : my_model_id,
            'messages' : [
                {
                    'role': 'user',
                    'content': "Which LLM model am I talking to right now?"
                }
            ]
        }
    )
    response = api.genai.create_genai_prompt(request)

    if response.genai_prompt is not None:
        print(f"{model_id}: {response.genai_prompt.responses}\n")
    else:
        print("No response.")
This defines the ask_ai_which_model() method, which will make it simpler to send the same prompt to different AIs and models.
Enter the following into a new cell:
model_ids = ['gpt-3.5-turbo', 'gpt-4o']

for model_id in model_ids:
    ask_ai_which_model(OPENAI_CONNECTION_ID, model_id)
This code sends the same prompt, 'Which LLM model am I talking to right now?' to two different OpenAI models, gpt-3.5-turbo and the new gpt-4o. It specifies which model to use with the 'model_id' key in the genai_prompt dictionary. Here's its output:
gpt-3.5-turbo: ['I am GPT-3, a language model developed by OpenAI.']

gpt-4o: ["You are interacting with a model based on OpenAI's GPT-4. How can I assist you today?"]
Let's try it with Claude. Enter the following into a new cell:
model_ids = ['claude-3-sonnet-20240229', 'claude-3-opus-20240229']

for model_id in model_ids:
    ask_ai_which_model(CLAUDE_CONNECTION_ID, model_id)
This code sends the 'Which LLM model am I talking to right now?' to two different Claude models, the currently available sonnet and opus models. Here's its output:
claude-3-sonnet-20240229: ["I am an AI assistant created by Anthropic, but I'm not sure which specific model I am. I don't have full information about the technical details of my architecture or training process."]

claude-3-opus-20240229: ['I am an AI assistant called Claude. I was created by Anthropic, PBC to be helpful, harmless, and honest.']
Next steps
While our unified GenAI API greatly simplifies the process of calling on various generative AI services, and leverage your customer's APi keys on those AI vendors, its real power comes from using it to process data from our other APIs, which integrate with an array of SaaS application categories, including:
- ATS (Applicant Tracking System): Use AI to analyze documents that job applicants provide, such as their resume or cover letter, as well interviewer notes and scorecard comments.
- KMS (Knowledge Management System): Find lost knowledge, convert text data into structured data, summarize meeting minutes, and gain new insights by harnessing an LLM to analyze knowledge systems, wikis, and other planning applications.
- Messaging: Our Messaging API can retrieve emails and chat messages, and when combined with AI, can be used to do things like construct a record of a project, create a timeline of an ongoing discussion, identify incomplete tasks, and more.
- Storage: Get files and documents from popular cloud storage systems and combine them with an LLM to generate reports, documentation, how-to guides, etc.
Try our GenAI API now
Our unified GenAI API is available on all Unified.to workspaces on every plan — even our free one. Once you've created your Unified.to account, you can activate integrations in seconds and start building applications that leverage our GenAI integrations.
See how easy it is to use our real-time unified API by signing up for our free 30-day unlimited-use Tester plan.
