How to build a Discord support bot with Unified.to and Langbase
December 12, 2024
Want to build an AI-powered support bot that can answer questions with information from an knowledge base?
In this guide, we'll show you how to combine Unified.to's data ingestion capabilities with Langbase's AI agent framework to create a powerful support bot. We'll pull content from your customers' knowledge management system (like Notion) through Unified.to, process it with Langbase's Memory Agents, and make it available to a Discord bot, powered by Unified.to's Messaging API, so it can answer support questions.
We'll be using React and Typescript in these examples, which you can adapt to fit your framework of choice.
Overview
This guide walks you through how to:
- Pull knowledge base content using Unified.to's KMS API
- Process and prepare this content using Langbase's Memory Agents
- Create an AI agent using Langbase Pipes
- Send responses through Discord using Unified.to's Messaging API
By combining Unified.to's unified APIs with Langbase's AI capabilities, we get the best of both worlds: easy access to your data sources and powerful AI features without the complexity of building everything from scratch.
Before you begin
Make sure you have:
- A Unified.to account
- A Langbase account
- Access to a knowledge management system (e.g., Notion) containing your support content
- Unified.to allows you to easily access your customers' data and that's normally what you would use in production, but for the purposes of this guide you can follow along with your own Notion account
- A Discord server where you want to deploy your bot
If you don't want to use real data from Notion or Discord, you can also take advantage of Unified.to's sandbox environment and work with synthetic data instead.
The following steps assume you already have your Unified.to account with your workspace ID and API key available. If you're new, check out our Quick Start guide to get familiar with the platform.
Set up your connections
The first thing you'll do is activate your preferred KMS platform to be the source of data for your bot. We'll use Notion in this guide, but our KMS API supports 8 platforms today and more are being added on a regular basis.
Note: If you're using the sandbox environment, for the steps below that ask you to enter your OAuth 2 credentials, just enter any random value e.g., test123.
Activate Notion and Discord integrations
- On app.unified.to, go to the Integrations page
- Search for and select Notion
- Choose OAuth 2, enter your credentials (which can be anything if you're using the sandbox environment), and then click Activate
Repeat steps 1-3 but for Discord. If you want to use real data from Notion and Discord, check out our how-to guides on setting up with them:
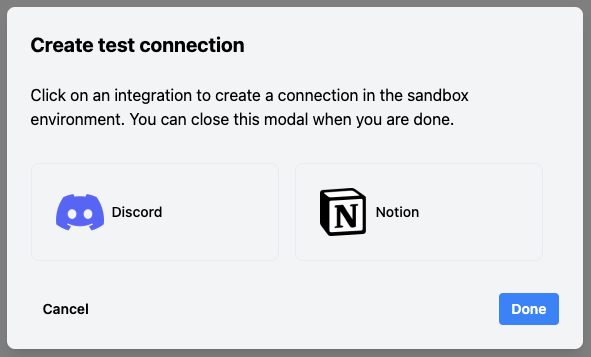
(Sandbox environment) Create a test connection from the web app
If you're using the sandbox environment, then you can create test connections easily from the web app.
- On app.unified.to, go to the Connections page
- Click on Create test connection at the top right corner of the page (note: this will only show up if your current environment is the sandbox environment)
- Click on the Notion and Discord integrations
- Click Done
Skip ahead to the 'Pull content from your knowledge base' step below.
(Production environments) Add the Authorization component to your app
To ask for your customers' permission to access their Notion and Discord accounts, you can add Unified.to's Authorization component to your front-end:
- Add the following React component to your app. Make sure to replace
WORKSPACE_IDwith your actual workspace ID.
// TODO: Make sure to run 'npm install @unified-api/react-directory'
import UnifiedDirectory from '@unified-api/react-directory';

<UnifiedDirectory workspace_id={WORKSPACE_ID}/>
We also offer pre-built embedded components in Angular, Vue, and Svelte. See other ways to display the Authorization component in your app here.
- If your customers' mainly interact with you through message-based platforms, you could even send them the Authorization URL through an AI chat agent instead of a web front-end!
The Authorization component displays a list of your integrations. When your user clicks on one of these integrations, the authorization flow will open up in a new tab. Your users will follow the steps to grant you access to their accounts. When that is done, they will be redirected back to your app (the default success URL location).
- Handle the callback after a user authorizes an integration. The connection ID will be sent back in the success URL - we need to save this to make API calls later on. In this example, we'll save the connection ID to local storage:
function handleAuthCallback() {
  const urlParams = new URLSearchParams(window.location.search);
  const connectionId = urlParams.get('id');

  if (connectionId) {
    console.log('New connection created:', connectionId);
// Store this connection ID securely - you'll need it for API calls
    localStorage.setItem('unifiedConnectionId', connectionId);
  }
}

window.addEventListener('load', handleAuthCallback);
For this guide, you can be your own test user:
- Click on the Notion integration in the Authorization component
- Grant access to your Notion workspace
- Repeat for Discord
- Save both connection IDs - you'll need them for the next steps
Note: In production, you should associate these connection IDs with your user's account in your database. For more information, see our guide on How to associate connection IDs with your users.
Pull content from your knowledge base
Now that you've got a connection ID, we can start making calls to the Unified API!
First, let's write some functions to recursively fetch all content from your KMS:
async function fetchContent(connectionId: string, apiKey: string) {
  const spaces = await fetchAllSpaces(connectionId, apiKey);
  const allContent = [];

  for (const space of spaces) {
    const pages = await fetchPagesInSpace(connectionId, apiKey, space.id);
    allContent.push(...pages);
  }

  return allContent;
}

async function fetchAllSpaces(connectionId: string, apiKey: string) {
  const response = await fetch(
    `https://api.unified.to/kms/${connectionId}/space?limit=100`,
    {
      headers: {
        Authorization: `Bearer ${apiKey}`,
      }
    }
  );

  if (!response.ok) {
    throw new Error(`Failed to fetch spaces: ${response.statusText}`);
  }

  return response.json();
}

async function fetchPagesInSpace(connectionId: string, apiKey: string, spaceId: string) {
  const response = await fetch(
    `https://api.unified.to/kms/${connectionId}/page?limit=100&space_id=${spaceId}`,
    {
      headers: {
        Authorization: `Bearer ${apiKey}`,
      }
    }
  );

  if (!response.ok) {
    throw new Error(`Failed to fetch pages: ${response.statusText}`);
  }

  return response.json();
}

// Usage
const content = await fetchContent(CONNECTION_ID, API_KEY);
API reference: KMS
Call fetchContent in your app to see the results. You should see a collection of Pages.
Process the content with Langbase Memory Agents
Now that we have our knowledge base content, we need to prepare it for AI consumption. Instead of building a complex RAG pipeline ourselves, we'll use Langbase's Memory Agents to handle all the heavy lifting - from text processing to embedding generation and storage.
First, let's install the Langbase SDK:
npm install langbase
Now we can create memory to store our knowledge base:
import { Langbase } from 'langbase';

const langbase = new Langbase({
  apiKey: process.env.LANGBASE_API_KEY!,
});

async function createKnowledgeBase() {
// Create a new memory
  const memory = await langbase.memory.create({
    name: 'support-bot-knowledge',
    description: 'Knowledge base for our support bot',
    embedding_model: 'openai:text-embedding-3-large'// Using OpenAI's latest model
  });

  return memory;
}
API reference: Create memory
Now let's process our Unified.to content and upload it to Langbase:
async function uploadContentToMemory(pages, memoryName: string) {
  for (const page of pages) {
    // Download the page content from Unified.to's download_url
    const content = await fetch(page.download_url).then(res => res.text());

    // Create a buffer from the content
    const documentBuffer = Buffer.from(content);

    // Upload to Langbase with metadata
    await langbase.memory.documents.upload({
      memoryName,
      documentName: page.title,
      document: documentBuffer,
      contentType: 'text/markdown', // Adjust based on your content type
      meta: {
        source: 'unified_kms',
        created_at: page.created_at,
        updated_at: page.updated_at,
        space_id: page.space_id
      }
    });
  }
}
API reference: Upload document
Langbase's Memory Agents will automatically:
- Process the text (Unified.to's data models have already cleaned the data for you!)
- Split content into optimal chunks
- Generate embeddings using state-of-the-art models
- Store and index everything for fast retrieval
Once your content is uploaded, you can create a Pipe to handle natural language interactions. Pipes are custom AI agents that can be exposed as APIs, making them perfect for our Discord bot:
async function createSupportBotPipe(memoryName: string) {
  const pipe = await langbase.pipe.create({
    name: 'Support Bot',
    type: 'chat',
    memory: memoryName,
    description: 'Support bot powered by our knowledge base'
  });

  return pipe;
}
API reference: Create pipe
This gives you a fully-functional RAG system with just a few API calls. No need to manage embeddings, vector stores, or complex AI infrastructure - Langbase handles all of that for you.
Set up real-time message monitoring
To make your support bot responsive, you'll need to set up webhooks to receive notifications when users send messages in Discord channels.
- Create a webhook to monitor Discord messages:
async function createDiscordWebhook(connectionId: string, apiKey: string, hookUrl: string) {
  const response = await fetch(
    'https://api.unified.to/unified/webhook',
    {
      method: 'POST',
      headers: {
        'Authorization': `Bearer ${apiKey}`,
        'Content-Type': 'application/json'
      },
      body: JSON.stringify({
        connection_id: connectionId,
        hook_url: hookUrl,
        object_type: 'messaging_message',
        event: 'created'
      })
    }
  );

  if (!response.ok) {
    throw new Error(`Failed to create webhook: ${response.statusText}`);
  }

  return response.json();
}

createDiscordWebhook(CONNECTION_ID, API_KEY, 'https://localhost:8000/webhook')
API reference: Create a webhook
- Set up an endpoint on your server to handle incoming webhook events. For example:
app.post('/webhook', async (req, res) => {
    // Verify webhook signature
  const { data, webhook, nonce, sig } = req.body;

    // Handle new messages
  for (const message of data) {
        // Ignore messages from the bot itself
    if (message.author_member.id === BOT_USER_ID) continue;

        // Process the message and generate a response
    const response = await generateBotResponse(message.message);

        // Send the response back to the channel
    await sendDiscordResponse(
      DISCORD_CONNECTION_ID,
      API_KEY,
      message.channel_id,
      response
    );
  }

  res.sendStatus(200);
});
- Validate incoming webhooks (recommended):
const crypto = require('crypto');

function verifyWebhookSignature(data, nonce, signature, workspaceSecret) {
  const hmac = crypto.createHmac('sha1', workspaceSecret);
  const calculatedSignature = hmac
    .update(JSON.stringify(data) + nonce)
    .digest('base64');

  return calculatedSignature === signature;
}
With this setup, your bot can:
- Receive notifications whenever a new message is sent in the monitored channels
- Process those messages through your AI pipeline
- Send responses back to the appropriate channel
For more details on webhooks at Unified.to, see our guide to webhooks.
Send responses through Discord
When you're ready to respond to a user's question, use our Messaging API to send the message back to Discord. Here's an example implementation with error handling and message formatting:
async function sendDiscordResponse(connectionId: string, apiKey: string, channelId: string, response: string) {
  const formattedResponse = formatDiscordMessage(response);

  const apiResponse = await fetch(
    `https://api.unified.to/messaging/${connectionId}/message`,
    {
      method: 'POST',
      headers: {
        'Authorization': `Bearer ${apiKey}`,
        'Content-Type': 'application/json'
      },
      body: JSON.stringify({
        channel_id: channelId,
        message: formattedResponse,
        message_html: formattedResponse, // Optional: Use for formatted text
      })
    }
  );

  if (!apiResponse.ok) {
    if (apiResponse.status === 401) {
      throw new Error('Authentication failed - check your API key');
    } else if (apiResponse.status === 404) {
      throw new Error('Channel not found - verify channel ID');
    }
    throw new Error(`Failed to send message: ${apiResponse.statusText}`);
  }

  return apiResponse.json();
}

function formatDiscordMessage(response) {
  // Example formatting for Discord markdown
  return `**Bot Response:**\n${response}`;
}

// Example usage with different message types
async function sendBotResponses(connectionId, apiKey, channelId) {
  // Simple text response
  await sendDiscordResponse(
    connectionId,
    apiKey,
    channelId,
    'Here is the answer to your question...'
  );

  // Response with code block
  await sendDiscordResponse(
    connectionId,
    apiKey,
    channelId,
    '```javascript\nconst example = "code block";\n```'
  );

  // Response with rich formatting
  await sendDiscordResponse(
    connectionId,
    apiKey,
    channelId,
    '**Bold text** and *italic text* with a [link](https://example.com)'
  );
}
API reference: Messaging
Putting it all together
Here's a high-level overview of how to combine all the components into a working support bot:
import { Langbase } from 'langbase';

async function initializeSupportBot() {
    // Initialize APIs
  const langbase = new Langbase({
    apiKey: process.env.LANGBASE_API_KEY!
  });

    // Get connection IDs - implement these based on how you manage your users
  const KMS_CONNECTION_ID = await getKMSConnection(user_id);
  const DISCORD_CONNECTION_ID = await getDiscordConnection(user_id);
  const UNIFIED_API_KEY = process.env.UNIFIED_API_KEY;

    // Step 1: Fetch content from KMS
  const kmsContent = await fetchContent(KMS_CONNECTION_ID, UNIFIED_API_KEY);

    // Step 2: Set up Langbase Memory and upload content
  const memory = await langbase.memory.create({
    name: `support-kb-${user_id}`,
    description: 'Knowledge base for support bot'
  });

  await uploadContentToMemory(kmsContent, memory.name);

    // Step 3: Create an AI agent using Langbase Pipe
  const pipe = await langbase.pipe.create({
    name: `discord-support-bot`,
    type: 'chat',
    memory: memory.name,
    description: 'Support bot powered by our knowledge base'
  });

    // Step 4: Set up Discord webhook for real-time messages
  const webhook = await createDiscordWebhook(
    DISCORD_CONNECTION_ID,
    UNIFIED_API_KEY,
    'https://your-server.com/webhook'
  );

    // Step 5: Handle incoming questions
  async function handleQuestion(channelId: string, question: string) {
    try {
            // Use the Pipe to generate a response
      const response = await langbase.pipe.chat({
        pipe: pipe.name,
        messages: [{ role: 'user', content: question }]
      });

            // Send the response back to Discord
      await sendDiscordResponse(
        DISCORD_CONNECTION_ID,
        UNIFIED_API_KEY,
        channelId,
        response.message
      );
    } catch (error) {
      console.error('Error handling question:', error);
    }
  }

  return {
    memory,
    pipe,
    webhook,
    handleQuestion
  };
}

// Usage example
async function startBot() {
  const bot = await initializeSupportBot();

    // Your webhook endpoint would call this when receiving messages
  app.post('/webhook', async (req, res) => {
    const { data, webhook, nonce, sig } = req.body;

        // Handle new messages
    for (const message of data) {
            // Ignore messages from the bot itself
      if (message.author_member.id === BOT_USER_ID) continue;

      await bot.handleQuestion(message.channel_id, message.message);
    }

    res.sendStatus(200);
  });
}
This implementation:
- Initializes both Unified.to and Langbase clients
- Creates a Memory AGent to store your knowledge base content
- Sets up a Pipe to handle natural language interactions
- Configures Discord webhooks for real-time messaging
The bot will now:
- Automatically receive messages from Discord through webhooks
- Process questions using your knowledge base through Langbase Pipes
- Send responses back to the appropriate Discord channel
All of this happens with minimal infrastructure management on your part - Unified.to handles the integrations while Langbase manages the AI components.
Conclusion
Congratulations! You've built a powerful support bot by combining Unified.to's integration capabilities with Langbase's AI features. In this guide, you learned how to:
- Pull knowledge base content from any system using Unified.to's KMS API
- Process and embed that content using Langbase Memory Agents
- Create an AI agent using Langbase Pipes
- Handle real-time messages through Discord using Unified.to's Messaging API and webhooks
As an added bonus, this architecture is incredibly flexible. Since you're using Unified.to's APIs, you can easily expand your knowledge sources - want to pull content from Confluence instead of Notion? Or deploy your bot on Slack? It's just a matter of changing the connection - your core logic stays the same.
And with Langbase handling the AI components, you can enhance your bot's capabilities without managing complex infrastructure:
- Experiment with multiple Memory Agents for different types of content
- Customize your Pipe's behaviour through prompt engineering
- Scale your bot without worrying about vector store management
Happy building!