How to register a Salesforce developer app and get OAuth 2 credentials
February 12, 2023
In this guide, we'll walk you through how to register a Salesforce developer app to get the OAuth 2 credentials you'll need to be a Salesforce integration for your product. Whether you're planning to build a custom-code integration or using a Unified API solution like Unified.to, retrieving your OAuth 2 credentials is the first step in the process of integrating with Salesforce.
We'll also added directional for existing Unified.to users that are leveraging our Unified CRM API for a faster integration development process.
What is a Salesforce Developer App?
A Salesforce developer app is a container for one or more developer apps. A developer app is an application that can access Salesforce data or functionality through the Salesforce REST, SOAP, or Streaming APIs.
A connected app defines the following information:
- The name and logo of the app
- The OAuth settings for the app, such as the callback URL, the scopes, and the refresh token policy
- The API version and the endpoints for the app
- The user profiles or permission sets that can access the app By registering a developer app, you can generate a client ID and a client secret, which are the credentials you'll need to authenticate your requests to the Salesforce APIs
Step 1: Register a Salesforce developer app
To register a Salesforce developer app, you'll need a Salesforce developer account. If you don't have one, sign up for free at https://developer.salesforce.com/signup. Once you have a developer account, follow these steps to register a developer app:
- Log in to your Salesforce developer account and go to Setup
- In the Quick Find box, search for App Manager and click on it
- Click on the New External Client App button
- Fill in the basic information for your app, such as the name, contact email, and logo URL
- Select
Packagedin Distribution State - In the API (Enable OAuth Settings) section, check the Enable OAuth Settings checkbox
- Enter the callback URL for your app (this is the URL that Salesforce will redirect the user to after they authorize your app). For Unified.to users, the callback URL needs to be
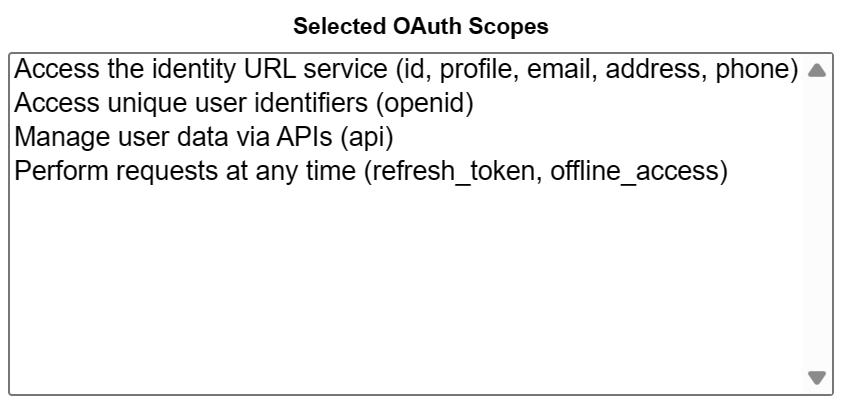
https://api.unified.to/oauth/code,https://api-eu.unified.to/oauth/codeorhttps://api-au.unified.to/oauth/code. - Select the OAuth scopes for your app (these are the permissions that your app will request from the user). To set up Unified.to successfully you'll need to add these OAuth Scopes:
Manage user data via APIs (api)andPlatform requests at any time (refresh_token, offline_access). If you are also going to use Salesforce to sign-in your users into your application, then also set theopenid,profile,emailscopes.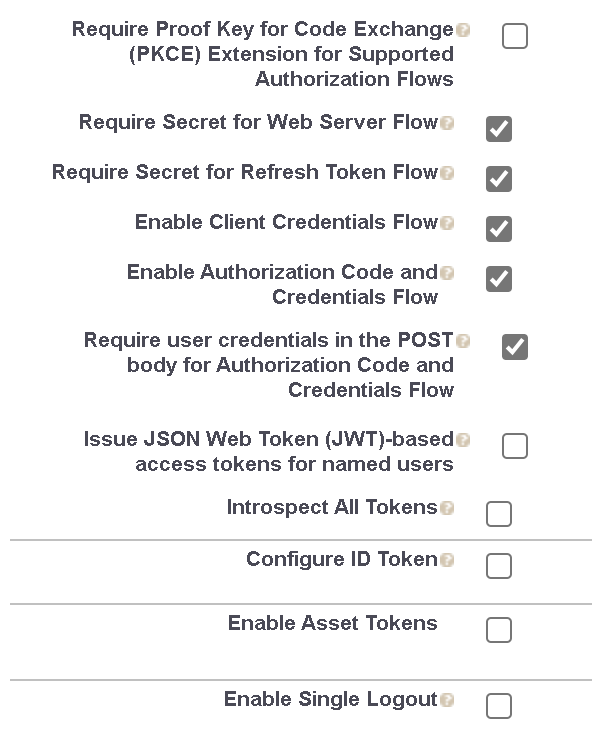
- Next, enable the following options for you app:
- Enable Authorization Code and Credentials Flow
- Require user credentials in the POST body for Authorization Code and Credentials Flow
- Require Secret for Web Server Flow
- Require Secret for Refresh Token Flow
- Do NOT enable CODE CHALLENGE (Require Proof Key for Code Exchange (PKCE) Extension for Supported Authorization Flows)
- Click Create
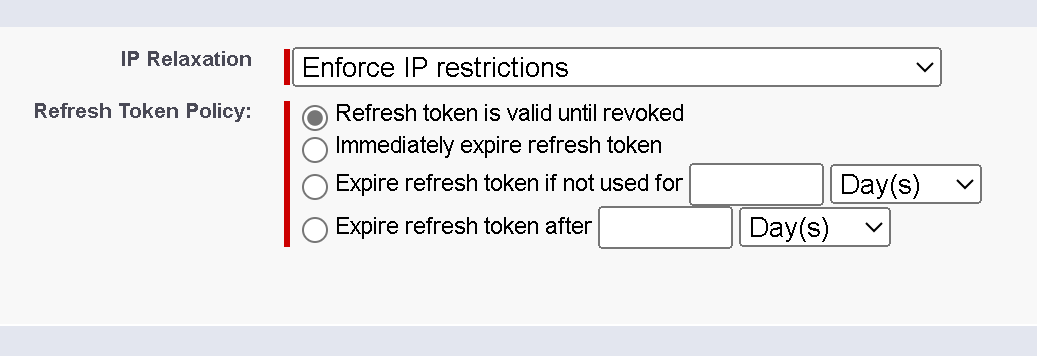
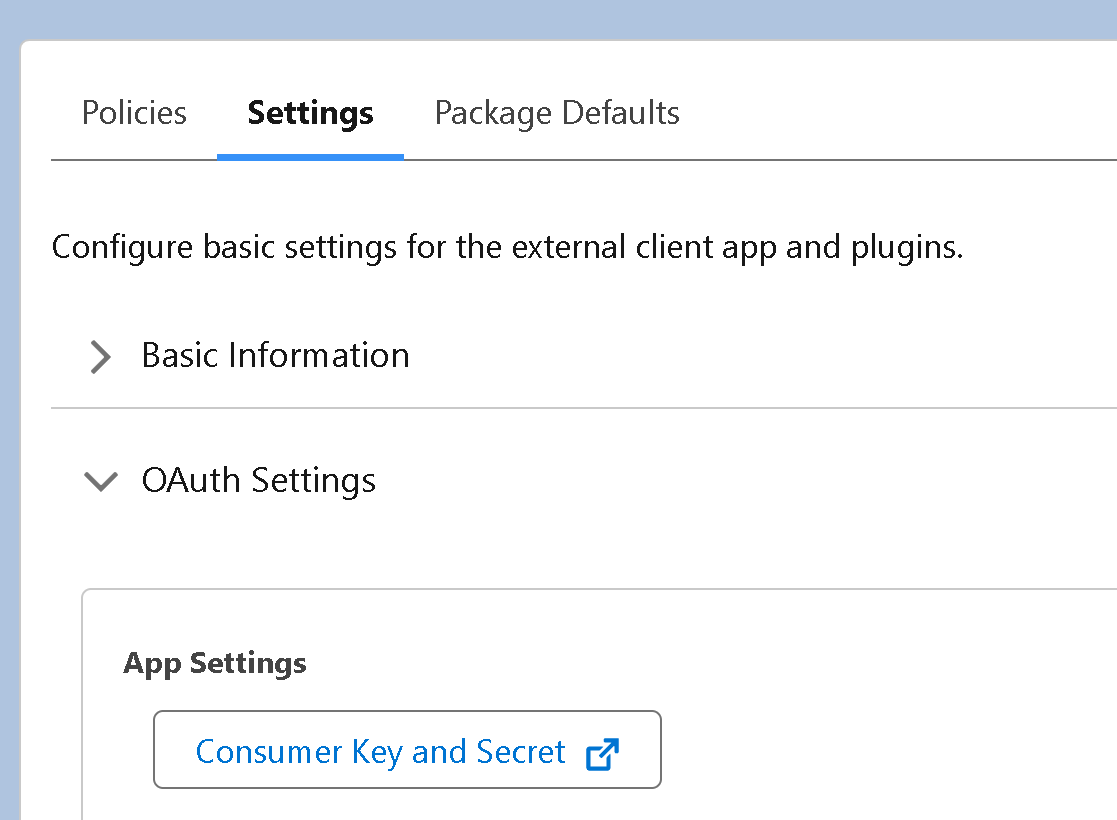
- Next click Edit under Policies tab

- Set 'Refresh token is valid until revoked' and click Save
- Lastly, go to Settings tab and retrieve you 'Consumer Key' (client ID) and 'Consumer Secret' (client secret).You will need these credentials to activate your Salesforce integration in Unified.to.
Step 2: Use Unified.to to Simplify Integration Development
Using Salesforce APIs directly can be a complex and time-consuming process, especially if you plan to integrate with other leading CRM platforms like HubSpot, ActiveCampaign, and Copper. Without Unified.to, you'll be tasked with handling authentication, error handling, rate limiting, data mapping, and the synchronization logic for each individual integration.
Unified.to simplifies this entire process, providing SaaS developers with a unified set of APIs, data models, and webhooks for 20+ CRM integrations. Add all the CRM integrations on your roadmap in a matter of hours.
Step 3: Activate Salesforce in Unified.to (for Unified.to users)
- Log in and navigate to Active Integrations
- Use the search bar or click the CRM tab to select Salesforce
- Click Activate on Salesforce
- Enter the information from the previous step (client ID, client secret)
Once you've activated Salesforce along with other integrations, you'll be able to add integrations to your product using our low-code authorization UI embed.
One API to integrate them all
You're reading this article on the Unified.to blog. We're a Unified API developer platform for SaaS customer-facing integrations. We're excited to continue to innovate at Unified.to and solve hard, critical integration-related problems for our customers. If you're curious about our integrations-as-a-service solution, consider signing up for a free account or meet with an integrations expert.